Tenebris: Terra Incognita Combat Tactics & Professions
Win turns before you win fights—positioning, armor, statuses, and field professions that fund the war.
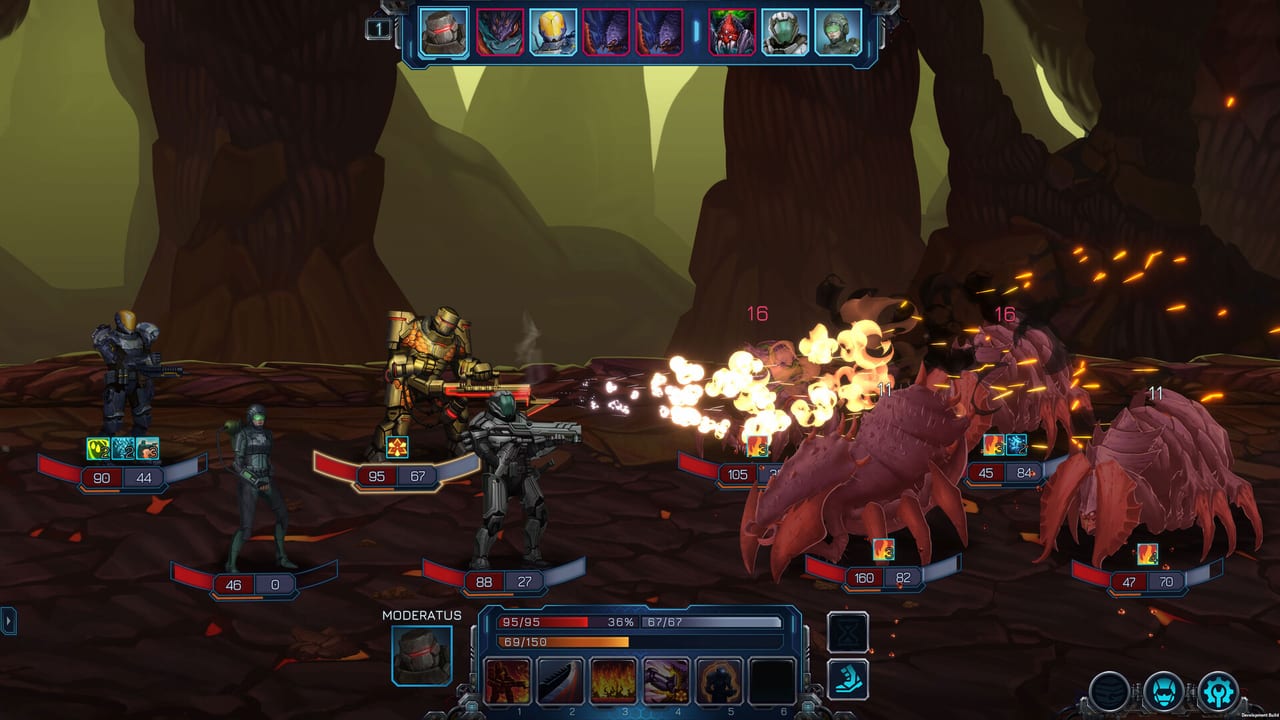
Combat in Tenebris: Terra Incognita rewards plans, not panic clicks. Bugs coordinate through chemical signals: the larger the swarm, the deadlier each individual becomes. Your job is to shrink fights quickly, protect accuracy and action economy, and convert every raid into gear that strengthens the next one. This guide covers core tactics for version 1.0 and the field professions tied to each starter archetype.
If you still need ship orientation or a starter roster, begin with Getting Started. For named encounters, pair these habits with Bosses.
Positioning and lanes
Battles play out on lane-aware grids familiar to fans of Disciples-style lines and XCOM-style threat management. Melee skills typically reach adjacent lanes; many ranged tools can strike farther or across the field. Before you commit a Miles charge or a Defencor taunt, check:
- Who can currently reach your backline?
- Which enemy will act next on the initiative order?
- Whether a pull, push, or knockdown relocates a threat into a worse tile for them—and a better one for you.
Keep Pellentes and Medicus out of free melee range whenever possible. Let Defencor occupy the ugly tile. Miles can forward-deploy for kills, but only after armor is stripped or the turn after a knockdown buys safety. Overextending into Goliath-style knockdown units is a classic first-week wipe.
Armor first, then damage
Many durable enemies shrug DoTs and soft hits until armor is gone. A consistent opener is:
- Strip or pierce armor on the priority target.
- Apply poison, bleed, or other lingering damage that now sticks.
- Focus fire to remove the model before it buffs neighbors or lands a party-wide debuff.
Piercing shots, dedicated break skills, and certain gadgets exist specifically to open targets. Dumping your biggest nuke into a fully armored Goliath feels strong and often fails. Watch skill icons for area shapes—grenades and cones can hit more than the portrait you clicked.
Burning, stacks, and status literacy
Status counters matter. Some effects escalate—burning interactions and stacked mucus that shreds accuracy are easy to misread if you only watch floating damage numbers. Practical rules:
- Clear or avoid accuracy debuffs on your sniper before the turn you need a clutch delete.
- Respect evolution counters on enemies that transform or detonate after enough stacks.
- Bring flamethrowers when the map says Pyrite caves; fire is not a meme loadout there, it is the equalizer.
- Track who is already broken so you do not waste a second armor skill while a full-health add is free-casting.
Medicus tools such as injectors that apply poison through armor are excellent for starting decay on targets you cannot fully break this round.
Taunts, knockdowns, and focus fire
Defencor exists so the rest of the squad can cook. Maintain taunt uptime when multiple melee threats are alive. Knockdowns that skip an enemy turn are tempo gold—use them on the unit about to ruin your sniper, not on a nearly dead add.
Focus fire beats polite spreading. Swarm chemistry punishes long multi-target stalemates. Delete the buffer, the spawner, or the accuracy-debuffing insect first when those roles appear. Save cleaves for turns when several soft bodies share a lane after the elite is handled.
Initiative and double turns
Initiative is a resource. Skills that lower enemy initiative or raise ally initiative can steal the queue and deny scary double turns. Building toward a high initiative threshold that grants an extra action is a powerful mid-fight swing—plan setup skills so your carry acts twice into a broken target. Conversely, let an enemy hit their bonus turn only if they are already controlled or irrelevant.
Combine this with equipment that modifies talents. Version 1.0’s depth comes from pairing trees with items, not from raw level alone. When you promote into advanced lines such as Impetum, Sancto, Vidua, Legionnaire, Centurio, Phoenix, Librator, or Ignifer, re-check which setup skills still enable your tempo plan. Concrete kit packages live on Builds.
Combat Concentration and Combo triggers
Two systems separate competent clears from highlight-reel turns: Combat Concentration and skills marked Triggers Combo.
What Combat Concentration does
Certain abilities put a hero into Combat Concentration—a ready state that means “I will join a coordinated attack if someone triggers it.” Concentration is usually a side effect of a setup skill, not a permanent passive you ignore. Track who is concentrated before you spend your finisher elsewhere.
What Triggers Combo does
When another character uses a skill tagged Triggers Combo, every ally currently under Combat Concentration performs a combo attack on their target at the same time. With perfect timing you can swing up to four soldiers at once. That burst is how heavier elites and bosses lose armor and HP bars that shrug single hits.
Practical combo rules
- One meaningful ability plan per hero turn — spend the setup on concentration, then let the trigger hero fire when the board is ready.
- Armor then HP — break or pierce before you chain the combo into a fully armored sponge; otherwise four heroes politely tickle plating.
- Watch initiative — sequence so concentrated allies are ready before the trigger skill resolves, and so the enemy does not delete your sniper between setup and payoff.
- Pick the right target — combo the priority threat (buffer, spawner, boss limb), not a leftover drone.
- Gear and talents matter — items that modify abilities often decide whether a kit can concentrate or trigger reliably; pair this section with Builds and Equipment & Arsenal.
Enemies can coordinate too—Misty Wastes pheromone buffs are the bug-side rhyme to your combos. Shrink the swarm before it stacks its own “party turn.”
Many heroes unlock stronger combo pieces around the early midgame talent tiers; the fantasy fully blooms once careers and gear catch up. If your damage “feels low” on bosses, ask whether you ever concentrated three allies before a trigger—not only whether your legendary rifle is shiny.
Hero professions in the field
Professions turn exploration nodes into strategic advantages. Each ties to an archetype and progresses through levels:
| Archetype | Profession | Field value |
|---|---|---|
| Technicus | Hacker | Opens locks; improves bonus loot and resources from secured containers |
| Medicus | Reanimator | Can rescue certain downed fighters on raids, expanding your hero pool |
| Defencor | Strongman | Clears rubble to open alternate dungeon paths and rooms |
| Miles | Marauder | Improves quality chances when searching fallen fighters |
| Pellentes | Scout | Finds hidden secrets with better resource yields |
You can still open some locks without a Hacker, but you leave value on the table. A Strongman in the party can rewrite a dungeon route. A Reanimator turns a risky side objective into a permanent roster upgrade. When planning a loot-heavy map, read the node types on the Biomes & Map page and bring the matching profession.
Squad templates by problem
- Swarm density (Misty Wastes): Defencor + cleave Miles + Pellentes delete + Medicus cleanse/heal. Kill count matters; do not admire elites while adds amp the pack.
- Armor sponges: Double break tools or Technicus utility plus sniper finishers.
- Pyrite caves: Flamethrower coverage, careful positioning in tight tunnels, and no underleveled tourism.
- Boss checks: Full hospital, spare ammo, and a plan for phase skills—see Bosses.
Common mistakes
- Ignoring armor and wondering why poison “does nothing.”
- Letting mucus stacks silence your sniper’s entire turn.
- Sending the same four heroes until fatigue and injuries cascade.
- Skipping professions on maps full of locks, rubble, and corpses.
- Promoting a career without resetting talents to match the new kit.
Practice loop
After each fight, ask three questions: Did we strip armor before big damage? Did the tank control who got hit? Did the map’s profession opportunities get used? Then spend loot on the ship using Solaris Base priorities. Cross-check carry choices on the Tier List Hub once multiple advanced classes are unlocked.
Master these fundamentals and later biomes—Necronoms included—become adaptation problems instead of brick walls. Bigger guns help; better turns win.
Frequently Asked Questions
Quick answers to the most common questions.
Should I break armor before applying poison or bleed?
Usually yes. Many durable enemies resist soft damage until armor is stripped. Pierce or break first, then apply DoTs and focus fire.
What does each hero profession do?
Hacker (Technicus) improves lock loot, Reanimator (Medicus) can rescue fighters, Strongman (Defencor) clears rubble, Marauder (Miles) improves corpse loot, and Scout (Pellentes) finds richer secrets.
When should I bring flamethrowers?
Pack them for Pyrite Tree cave missions where fire equalizes dangerous subterranean bugs. See Biomes & Map before diving.
How do taunts fit into focus fire?
Use Defencor taunts and knockdowns to protect your sniper and healer while the squad deletes the highest-priority threat each round.
Where do I go after learning basic combat?
Review Bosses for encounter prep, Builds for kit plans, and Getting Started if your early roster still feels unstable.